Showing posts with label skookie. Show all posts

Monday, November 2, 2009

**TACO RING**

This is another one of those quick dinners that I like to fix every now and again. I usually make it with 2 cans of crescent rolls and make a big ring on a cookie sheet but I absolutely loved how they turned out in the Skookie pans...

First, lightly grease your skookie pans and prepare 1 lb of taco meat. 1 can of crescent rolls made two rings in the Skookie pans. Each ring should feed 2 people. Open your refrigerated crescent rolls and unroll them. Place 3 crescent rolls as shown below on each Skookie!

Now, spread your prepared taco meat around the ring. Top with 1/2 cup shredded cheese, your choice. I like a taco blend with pepperjack and cheddar.

Now, just simply fold over the long ends into the middle. It will fill in the hole in the middle. If you were to make this on a large pan, you will have a whole in the center.


Bake at 350 degrees for 15 minutes or until golden brown. As soon as I get it out of the oven, I top it with 1/4 cup or so of shredded cheese. It will melt and is so yummy!!! I took this picture to show how nice the taco ring comes off the pan and how easy the clean up is. Just simply wipe with a paper towel. Make sure it's dry before putting it away


You can add other taco toppings like lettuce, tomatoes, kidney beans, salsa, sour cream, guacamole, etc. My family is rather boring so they stick with cheese and lettuce ;-)


**Like I mentioned, this can be made as a large taco ring if you use 2 cans of crescent rolls and use all 12 rolls in the ring. Alternate the ends when you're folding them in...

Enjoy!!!!

**Don't forget to leave your comments for a chance to win a FREE set of SKOOKIE PANS!!!!**

Happy Cooking!
*Teauna*

Friday, October 30, 2009

**APPLE PIE TART**

After visiting with my mom on the phone this morning, we both decided we had a major case of "need to spend a day together"... so I loaded my tote full of cookbooks and goodies and loaded my car with kids and off we drove, over the river and thru the woods (to Grandmother's house we go!) Of course, I brought my SKOOKIES!!!! Mom and I put our heads together and created this recipe for the skookies... Can I tell you that the heavens are singing loudly!!!! First we got the kids together and had them use the apple peeler/corer/slicer to peel/core/slice the apples. That's a good activity for the little kidlets.


First:
6 small apples, cored/peeled/sliced
dash of lemon juice
1 tsp cinnamon
1/2 tsp nutmeg
1/4 cup brown sugar
1 Tablespoon flour for thickening


Mix this together in a bowl and set aside...

When I make any sort of dessert I like to grease the pan well to assure that it'll come off the pan without sticking.

Now either make your own pie crust or buy some pre-made crusts, whatever you prefer.


The pie crust recipe I use is:

2 cups flour
1/2tsp salt
2/3 cup butter flavored crisco

Mix well with pastry blender or cut with two knives. Sometimes I improvise and use a wire whisk and just mix it until it's all crumbly.
Then add about 8 Tablespoons of cold water and mix with your hands. It should be just a little sticky but not wet. If it is wet, just add a little flour. Don't overmix or your pie crust will be tough.


Now this was more than I needed so you could probably cut the recipe in half, but I had a better idea which I'll share later...:-)


Now roll two 8" circles about 1/8-1/4 inch thick and put in your well-greased skookie. It should hang over the edges about 2 inches all the way around. If it's not perfect, no worries, mine wasn't either :-)


Now put half of your filling in each skookie on the pie crust. Now just fold the crust up over the filling about 2 inches around and just fold and pinch it together...(refer to pic)


Put a tablespoon of butter in the center.


Place in oven at 425 for 30 minutes...

Take out and ENJOY!

With the remaining crust, I rolled it out into (2) 6-inch circles, placed them on the greased skookie pans and sprinkled them with cinnamon and sugar and put it in the oven at 425 for about 10 minutes or so until it was golden brown and all puffy... soooooo good!!! This is a spectacular treat for the kids!
*****DON'T FORGET TO LEAVE YOUR COMMENT FOR YOUR CHANCE TO WIN A FREE SET OF SKOOKIE PANS*****
Happy Cooking!
*Teauna*

Monday, October 19, 2009

**BROWNIES WITH HOMEMADE HOT FUDGE SAUCE **

Once again, it was 'SKOOKIE NIGHT' at our house. I made brownies and homemade hot fudge sauce. This is always a good treat and soooo much cheaper than what you'd pay if you got one at a restaurant.

First prepare your pans. Make sure that they are wiped clean and you can go ahead and spray them with a little non-stick cooking spray for safety sake. :-)

For the brownies:

2 cubes melted or soft butter
2 cups sugar
4 eggs
2 tsp vanilla
1 tsp salt
1 1/2 cups flour
1/2 cup cocoa
1 cup chocolate chips

Cream together butter and sugar. Add eggs and vanilla. Combine salt, flour, & cocoa in a small bowl and add to creamed ingredients. Then stir in chocolate chips. Reserve 1/2 cup batter. Divide remaining batter between four skookie pans. (this recipe works well in a 9x13. Just don't reserve that 1/2 cup batter:-) )
Put in a preheated 350 degree oven and bake for 25 minutes. Remove from oven and set on cooling racks to cool slightly. (If baking in 9x13 pan, bake 30-35 minutes)
**either eat that reserved 1/2 cup of batter (the kids love it!) or just throw it away. If you don't, you'll have a real mess in your oven!**
Serve with vanilla ice cream and homemade hot fudge sauce. (recipe follows)

Homemade hot fudge sauce:

1 1/2 cups sugar
1/2 cup brown sugar
1/4 cup cocoa
1/3 cup flour
1/4 tsp salt
1 can evaporated milk
1 cup water
2 T. butter
2 tsp vanilla

Mix all ingredients well in a saucepan. Cook until thick. Serve warm over brownie and ice cream. Top with whatever fun toppings you choose :-)

Happy Cooking
*Teauna*

Thursday, October 15, 2009

** PERSONAL PAN PIZZAS **

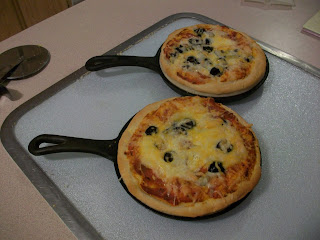
It is 'SKOOKIE NIGHT' at our house tonight!!!! We are making yummy personal pan pizzas! So much fun and so little work and clean-up. Love these kind of meals...and the interaction with the entire family makes it even better!

I LOVE using cast iron for pizza because you don't get the doughy crusts! I don't like ''doughy'' anything! I also have a Camp Chef cast iron Pizza Pan! When we are having 'SKOOKIE NIGHT' and make pizza, I use the Pizza Pan and make breadsticks for our appetizer. But of course, you can use your regular pizza pans if you don't have cast iron:-) However, if you do want to check out this pan or skookies, go to http://www.outdoorcooking.com/ . They carry the full line of Camp Chef prdoucts and they are less expensive there then on the camp chef site. You can find the Skookies at these stores: Smithfield Implement, R&R Hardware, IFA, CAL Ranch, Al's Sporting Goods, or Kitchen Kneads.

My favorite thing about cast iron is that it doesn't wear out! It just gets better with time and use and it can be used both inside and outside for generations and generations! What more could you ask for?

The first thing I do to get ready for our pizza party is prepare the pizza dough... it needs to rise so prepare it an hour and a half or so before you plan on making dinner. Set is aside and while it is rising, prepare all your toppings for your pizzas! Try all different kinds of toppings. You know, it's amazing how kids will try something when they are the ones putting it on their pizza!

For the pizza dough:

1 Tablespoon active dry yeast

1 cup warm water

1/2 teaspoon salt

2 teaspoons oil

2 1/2-3 1/2 cups flour

Dissolve yeast in warm water in warmed bowl. Add salt, oil & 2 1/2 cups flour. Mix well. Add remaining flour and knead. You just want to knead this until it's no longer sticky. I use about 3 cups of flour. Place in greased bowl- cover and let rise until doubled. A good way to tell that your dough has doubled is to poke your finger in the middle of it. If the indentation stays then it is ready.

*I make this in my kitchenaid mixer and let it do all of the work :-), however I have made it the 'old fashioned' way and it's simple. Just don't overthink it. Knead until it's smooth and elastic and you'll be good!*

* I usually double this recipe so I have enough for at least 4 personal pan pizzas and a large pizza pan of breadsticks. If you are using a mixer, just mix one batch at a time then put them in a pan together. They will rise together.*

Now for the pizza sauce:

Mix well together:

1 can tomato sauce

1 can tomato paste

1 Tablespoon oregano

1 clove garlic, minced

1 1/2 tsp basil

1/2 tsp sugar

1/2 tsp onion salt

Prepare and refrigerate until you're ready to put the pizzas together!

Now just prepare the toppings for your pizza! Here are some ideas:

*pepperoni

*canadian bacon

*chopped honey-baked ham

*cooked and rinsed sausage or hamburger

*chopped olives

*pineapple

*shredded cheese

*green peppers

*etc, etc, etc

After your dough has risen, punch it down and make sure your skookie pans are clean and you can lightly grease them if you would like. Once you have used them several times, you should not have to use any grease at all. They are preseasoned but for the first few uses, I would say it's better to be safe than sorry and it does help the seasoning process. :-)


Now take about a baseball size of dough and spread on your skookie pan. Then put on your sauce and your toppings. Bake at 450 degrees for 15-20 minutes or until they are golden brown. Take out of the oven and slide pizza onto a cutting board. Cut and Serve!!!


Like I said, if you double this recipe, you should be able to make 4 individual pizzas with the skookies and a 14inch pan with breadsticks. For the breadsticks, I just pat the dough out on the pizza pan then brush with softened margarine or butter, then sprinkle with parmesan cheese and garlic salt. Bake 20-25 minutes until gold brown. Slice and serve with remaining pizza sauce for a dipping sauce.

I hope you enjoy this as much as we do!


Happy Cooking!

*Teauna*

Tuesday, October 13, 2009

*** FREE CAMP CHEF SKOOKIES ***

I am soooo excited! I have decided to have a giveaway and it's a GOOD one! A CAMP CHEF SKOOKIE SET WITH CHOCOLATE CHIP COOKIE MIX could be yours! So here is the deal: I will continue to do my normal recipes that I have been posting. But at least 2 days a week for the next month, I will post a recipe that can be used with a skookie pan. You can use all these recipes in your pans you have at home too, this will just be a great way to get more ideas and creativity in your kitchen.
Items like these in your kitchen are priceless because you can also use them in your outdoor kitchen too.... and they will last for generations and generations. They are made of cast iron and over time will develop a wonderful finish that makes them easy to cook with and clean. They are pre-seasoned so they already have a nonstick finish but they only get better with time and use!
I have a couple sets of these pans and we love to have "Skookie Night" at our house! It is SO MUCH FUN!
So, this is what I need from you: When you read a post on my blog, leave a comment. Suggest new ideas, give me any suggestions you may have, try the recipes and report back how you liked them, etc. I want to hear from you people! At the end of the month period, I will number the comments and randomly draw a number and the owner of that comment will win the AwEsOmE set of SKOOKIE PANS!
Remember to tell your friends about the drawing for **FREE CAMP CHEF SKOOKIES**.

Can't wait to hear from all of you!

Happy Cooking!
*Teauna*